Are you tired of dealing with a damp, musty basement? Don’t let moisture issues turn your home into a smelly, mold-infested space. It’s time to take action and waterproof your basement like a pro!
A dry basement isn’t just nice to have—it’s essential for protecting your home’s foundation and preventing structural damage down the road. Excess moisture can cause wood rot, crack concrete walls and floors, and create the perfect breeding ground for mold and mildew. A wet or damp basement can lead to serious air quality issues and an increased risk of water damage to stored belongings. Not to mention, who wants to be in a space that’s soggy and smells of mildew?
Waterproofing your basement is the answer to keeping moisture out and maintaining a comfortable, usable home. With the right waterproofing solution, you can say goodbye to water stains, humid air, and future costly foundation repairs. Whether you want to make the most out of valuable square footage, finish your basement, or just keep your peace of mind, a waterproofed basement provides a solid foundation (literally!) for all of your plans.
When Should You Consider Waterproofing Your Basement

If you’ve noticed any of these telltale signs of moisture intrusion in your basement, it’s time to take action before further damage occurs. Look out for these red flags that indicate the need to waterproof your basement:
- Visible mold or mildew growth on drywall, concrete block walls, or floors
- Damp or wet basement walls and concrete floors
- Musty, moist odors indicating water intrusion
- Water stains or efflorescence (white mineral deposits)
- Peeling paint or bubbles in flooring
- Cracks in the foundation walls or basement floor
- Window wells allowing water entry
Causes for Moisture in Basement

There could be several sources contributing to that damp, musty basement ambiance you’ve been noticing. Basement water problems and dampness can originate from both interior and exterior sources including:
- Leaks in pipes, appliances, or sump pumps
- Humid air and condensation due to poor ventilation
- Cracks or holes in concrete foundation walls or floor
- Poor exterior grading and drainage around the home
- High water table or levels of groundwater
- Hydrostatic pressure from the saturated soil surrounding the basement
Don’t let moisture gain a foothold in your basement! Identifying and addressing the underlying causes is crucial.
How to Find the Source of the Moisture
For any of these issues, the first step is pinpointing where the moisture is coming from. Tape aluminum foil to suspected areas of the wall, leaving it for 24 hours. If condensation appears on the room-facing side, the issue is humid basement air that needs better ventilation. If moisture forms between the foil and wall side, water is seeping through from the exterior soil or foundation cracks.
Waterproof Coating Options

Once you’ve identified the source of the moisture infiltration, it’s time to explore the best way to waterproof your basement and regain control. There are several coating options to consider, each with their own advantages:
- Hydraulic cement for sealing cracks and holes in basement walls or floors
- Silicate concrete sealants (like DRYLOK) that penetrate into the concrete
- Waterproof concrete coatings that form a flexible, rubber barrier
- Waterproofing interior paints for an extra protective layer over sealed areas
- Epoxy injection to repair larger foundation cracks
With so many proven waterproofing materials and methods at your disposal, you can tackle that damp basement head-on and create a warm, dry, comfortable space to enjoy once again.
Basement Waterproofing
Taking matters into your own hands? With some elbow grease and the right materials, you can transform that damp dungeon into a dry, usable space.
Interior Basement Waterproofing
Follow these key do-it-yourself (DIY) steps to waterproof the interior of your basement walls and floors.
1. Remove Standing Water

First things first—get rid of any visible pooled water using a wet vacuum. Don’t let it sit stagnant, creating an inviting environment for mold and mildew. Once cleared out, set up fans and dehumidifiers to thoroughly dry out every nook and cranny of the basement space.
2. Find the Source of Moisture

Remember that aluminum foil test to determine if moisture is entering from humid air or directly seeping through the basement walls and floor? Now’s the time to give it a try and get to the root of the problem.
3. Clean the Area

Proper preparation is key! With the area dry, scrape off any peeling paint, efflorescence (those pesky mineral deposits), or debris that could interfere with the waterproofing coatings’ ability to properly adhere. Use a stiff wire brush and chemical cleaners like muriatic acid as needed for a clean, prepped surface.
4. Seal Cracks and Holes

Locate any cracks or holes in the concrete block walls and floors, as these provide easy entry points for moisture intrusion. Fill them with hydraulic cement or concrete repair products to create a waterproof barrier. No more leaks slipping through the cracks!
5. Seal Windows, Doors and Pipes

Windows, doors, and areas where utility pipes enter are also common culprits for allowing water inside. Seal them up tight by applying a layer of caulk or expandable spray foam, blocking any potential entry points. An ounce of prevention is worth a pound of cure.
6. Apply Waterproof Coatings

With problem areas sealed, it’s time to create that waterproof surface membrane. Brush or roll on waterproofing paint such as a silicate-based concrete sealer or rubberized coating over the basement’s walls and floor. Don’t be stingy—multiple coats may be required for full protection.
7. Install Interior Drainage

For situations with persistent, stubborn water intrusion that the coatings alone can’t solve, install an interior perimeter drain tile system. This catches any leaking water and funnels it to a sump pump before it can spread. You may also need to cut a French drain into the floor slab. When moisture gets tough, get tougher!
Exterior Basement Waterproofing
Tackle outdoor moisture sources as well with these exterior waterproofing steps:
1. Grade Your Garden

Make sure your garden soil slopes down and away from the home’s foundation to direct water away from the basement walls.
2. Place Gutters

Install gutter systems to catch roof runoff and route it away from the basement via downspout extensions.
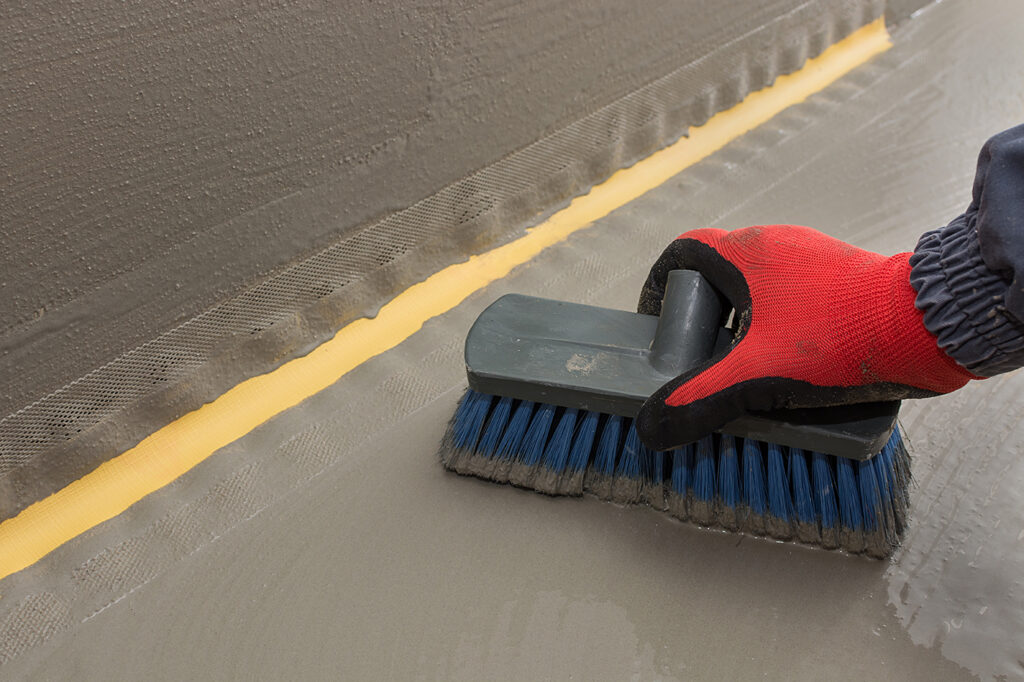
3. Apply Sealer to Exterior Wall

For severe moisture issues, exterior waterproofing membranes like rubberized asphalt can be applied to the below-grade portion of the foundation walls.
4. Install Exterior Drain Tiles

Place drain tiles along the base of the exterior foundation connected to a sump pump to catch and remove groundwater from the soil surrounding the basement.
How Much Does it Cost to Waterproof a Basement?
The national average cost for professional basement waterproofing ranges from $2,300 to $6,800, with most homeowners paying around $4,500. Doing some of the work as a DIY project with coating products can save significant money, costing only $3.70 to $10 per square foot for materials.
To reduce costs, tackle any simple crack repairs yourself first. Focus on properly preparing and cleaning the area. Also look into bundling waterproofing with other basement remodeling projects, like installing drywall, to save on labor.
Hire Professional Help

For major moisture issues with large foundation cracks, bowing walls, or recurring leaks, it’s best to hire an experienced basement waterproofing contractor. They can properly diagnose the issue and apply more robust solutions like exterior waterproofing membranes, drain tile systems, or foundation repair methods.
Taskrabbit has a network of highly skilled and vetted home repair Taskers who can provide top-notch basement waterproofing systems and services at competitive rates. Keeping your basement dry protects your home’s structural integrity and value, so don’t delay in addressing persistent moisture problems!
FAQ Section

Whether you’re dealing with humid air, groundwater, or foundation cracks, read on for common FAQs to help you keep your basement dry.
What is the best way for waterproofing basement walls?
To stop water seepage through basement walls, you’ll need to first identify the source—is it humid air, groundwater, or foundation cracks? Then apply appropriate waterproofing techniques like sealing cracks, installing drain tile systems, grading soil to divert water, and applying waterproof coatings or membranes to the interior or exterior basement walls.
What is the best waterproofing method for a basement?
The best overall waterproofing method is typically a combined interior and exterior approach using multiple techniques. Seal any cracks and holes in the interior concrete walls and floor, apply waterproof coatings, and also check for proper exterior grading. Consider installing drainage systems like a French drain, or potentially apply waterproof membranes to the outside of the foundation walls as well.
What is the easiest waterproofing method?
The easiest basement waterproofing methods for DIYers are interior techniques like sealing cracks with hydraulic cement, painting on waterproof coatings, installing drainage channels connected to a sump pump, and using DRYLOK or other concrete sealers on the basement floor and walls.
Which is the cheapest basement waterproof?
The cheapest basement waterproofing method is typically applying a waterproof paint coating, which can cost as little as a few dollars per square foot for materials if doing it yourself. Caulking cracks and opting for interior solutions is cheaper than exterior excavation.